
在本 HTML 教程中,您将学习有关 HTML 中表格标签的所有知识。我们还将讨论 HTML 中最常用的表格标签属性。
HTML 表格标签用于以表格格式(行 * 列)展示数据。一行可以包含多个列。使用 <table> 元素以及 <tr>、<td> 和 <th> 元素,我们可以创建一个表格来以表格格式显示数据。每个表格的行由 <tr> 标签定义,表头由 <th> 标签定义,表格数据由 <td> 标签定义。HTML 表格用于管理页面的布局,例如页眉部分、导航栏、正文内容、页脚部分等。但是,建议您使用 div 标签而不是表格来管理页面的布局。
示例
<table> 元素用于创建表格。要在 <table> 元素内创建行,请使用 <tr> 元素;要在一行内创建列,请使用 <td>。
<!DOCTYPE html>
<html>
<head>
</head>
<body>
    <h1>This is Style attribute</h1>      <p  height: 50px; color: blue " >It will add style property in element</p>      <p  color: red " >It will change the color of content</p>
</body>
</html>
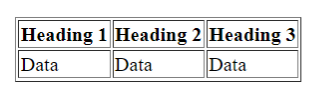
默认情况下,表格没有任何边框。要为表格添加边框,我们可以使用 border 属性,或者使用 CSS border 属性。
| 标签 | 描述 |
|---|---|
| <table> | <table> 标签用于定义一个表格。 |
| <tr> | <tr> 标签用于定义表格的行。 |
| <th> | <th> 标签用于定义表格的表头。 |
| <td> | <td> 标签用于定义表格的数据。 |
| <caption> | <caption> 标签用于为表格指定标题。 |
| <colgroup> | <colgroup> 标签用于为一组列指定格式。 |
| <col> | <col> 标签与 <colgroup> 标签关联,用于为表格的列指定格式属性。 |
| <tbody> | <tbody> 标签用于对表格的主体内容进行分组。 |
| <thead> | <thead> 标签用于对表格的表头内容进行分组。 |
| <tfooter> | <tfooter> 标签用于对表格的页脚内容进行分组。 |
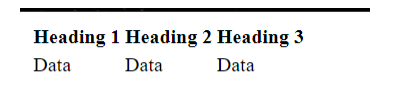
在 HTML 中为表格添加边框主要有两种方法
我们可以使用 border 属性来为表格指定边框。
<table border=1>
  <tr>
    <th>Heading 1</th>
    <th>Heading 2</th>
    <th>Heading 3</th>
  </tr>
  <tr>
    <td>Data</td>
    <td>Data</td>
    <td>Data</td>
  </tr>
</table>
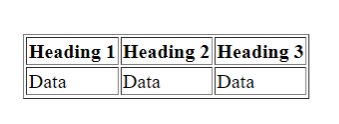
我们可以使用 border 属性来为表格指定边框。
<style>
table, th, td {
  border: 1px solid black;
}
</style>
<table border=1>
  <tr>
    <th>Heading 1</th>
    <th>Heading 2</th>
    <th>Heading 3</th>
  </tr>
  <tr>
    <td>Data</td>
    <td>Data</td>
    <td>Data</td>
  </tr>
</table>
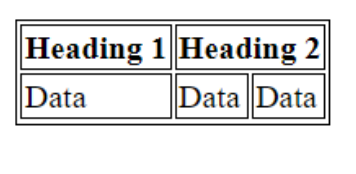
您可以使用 colspan 属性使一个单元格跨越多个列。一个单元格/行被分成多个列,列的数量由 colspan 属性确定。
<style>
table, th, td {
  border: 1px solid black;
}
</style>
<table border=1>
  <tr>
    <th>Heading 1</th>
    <th colspan=2>Heading 2</th>
  </tr>
  <tr>
    <td>Data</td>
    <td>Data</td>
    <td>Data</td>
  </tr>
</table>
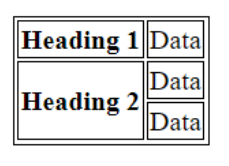
您可以使用 colspan 属性使一个单元格跨越多个行。一个单元格将被分成多个行。rowspan 属性确定了分成的行数。
<style>
table, th, td {
  border: 1px solid black;
}
</style>
<table>
<tr>
  <th>Heading 1</th>
  <td>Data</td>
</tr>
<tr>
  <th rowspan="2">Heading 2</th>
  <td>Data</td>
</tr>
<tr>
  <td>Data</td>
</tr>
</table>
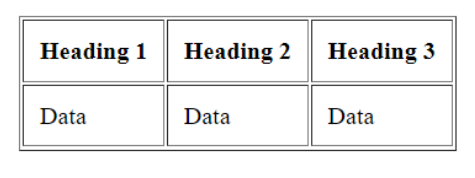
每个单元格之间的空间称为单元格间距。默认设置为 2 像素。cellspacing 属性用于指定单元格间距。
<table border=1 cellpadding=10>
  <tr>
    <th>Heading 1</th>
    <th>Heading 2</th>
    <th>Heading 3</th>
  </tr>
  <tr>
    <td>Data</td>
    <td>Data</td>
    <td>Data</td>
  </tr>
</table>
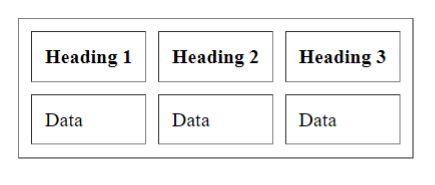
单元格边缘与单元格内容之间的填充称为单元格内边距。内边距默认设置为 0。cellpadding 是用于向单元格添加内边距的属性。
<table border=1 cellpadding=10 cellspacing=10>
  <tr>
    <th>Heading 1</th>
    <th>Heading 2</th>
    <th>Heading 3</th>
  </tr>
  <tr>
    <td>Data</td>
    <td>Data</td>
    <td>Data</td>
  </tr>
</table>
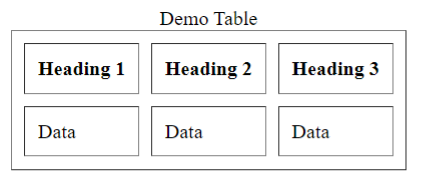
使用 <caption> 元素,我们可以为表格指定一个标题。<caption> 元素必须放在起始的 <table> 标签之后。默认情况下,标题显示在表格的顶部,但您可以使用 CSS 的 caption-side 属性调整其位置。
<table border=1 cellpadding=10 cellspacing=10>
 <table border=1 cellpadding=10>
  <tr>
    <th>Heading 1</th>
    <th>Heading 2</th>
    <th>Heading 3</th>
  </tr>
  <tr>
    <td>Data</td>
    <td>Data</td>
    <td>Data</td>
  </tr>
</table>